Sunday, February 16, 2014

Valentine's 2013 Medley Nail Design


I hope everyone had a good Valentine's Day full of love with significant others, friends, and/or family!! 
For my own Valentine's nail design, I couldn't quite decide between a few different designs. My boyfriend had the answer:: do all of them!! 


My base colors were::
Sinful Colors in Snow Me White
Glaze in Exceptionally Gifted
Sinful Colors in Slate
Sinful Colors in Out of This World (just a thin coat works since you add more with the gradient) 
Nina in Lilac-ing Discipline

I use my sponge technique for the gradient with Sinful Colors in Out of This World, Dancing Nails, and Under 18.


On the nail with the Snow Me White base, I was inspired by this heart balloon design, but opposite colors. For the hearts, I used China Glaze in Ruby Pumps. I used a very small dotting tool and did two dots right next to each other. I then used the dotting tool to do the bottom of the heart by dragging polish from the two dots down to a point, and then continued straight down to the edge of the nail. 

On the nail with the Exceptionally Gifted base color, I used my dotting tool to make hearts with Sinful Colors in Black on Black. I was hoping to manage making all the hearts the same size but I'm not quite THAT steady with the dotting tool, so my hearts varied in sizes :)

For the nail with the Slate base color, I was inspired by this design with the light gray and pink and white hearts drawn on. I used Black on Black, Kiss Bikini Pink, and Kiss Silver Glitter for my heart outlines. 

On the nail with the gradient, I really didn't know what to add to it. I thought about making a heart outline in black, but that seemed too simple. I ended up using some of the rhinestones that I have to add some bling! I used stones in pink, silver, and red and arranged them in a heart, with the pink in the middle of the pinkish polish, the red stones over the silver polish, and silver stones over the red polish. 

NOTE ON USING THE RHINESTONES::
In the past, I've used the Best Glue Ever since I've seen it recommended on a few different nail blogs. It seems to work ok, but in the past most stones would last a few days and then fall off, so that I'd hafta glue another on. And excess glue can stick out from around the stone and can add up when putting the second or third stone on the same spot. 
This time (mainly because with the heart design I knew I'd need to arrange, rearrange, and move the stones around a lot) I decided to put a top coat on and then place the stones while the polish was still nice and wet. That way I could move the stones around as needed to get the design right. After that was dry, I put an extra 2 layers of top coat (trying to minimize how much goes over on top of the stones). The stones were stuck there for over a week without falling off! I lost two stones, but they BROKE off, leaving the flat bottom behind. The top coat I use is from Beauty Secrets :)

On the nail with Lilac-ing Discipline as the base, I used a nail art pen Sally Hansen in Green on one hand and Bright Blue on the other. The pens made it easy to write out "QT PIE" and "I <3 U" inspired by the candy hearts. 


I definitely had some fun with this! Happy VDay!! <3 <3 <3

Saturday, February 8, 2014

Pink and Black Patterned Nail Design

I loved this manicure! It was so pretty and simple!!


First off, I left my right pinky with the sparkly silver left over from my New Years Design::


The rest of my nails, I painted China Glaze in Exceptionally Gifted.


On most of my fingers, I used Black on Black with a fine striping brush to draw diagonal lines from bottom left to top right, and then from bottom right to top left, intersecting each other.


On my ring fingers, I used striping tape going diagonally to mark out a type of checkered pattern.


Then I painted over the tape with Black on Black, waited a minute or two, and took off the tape, leaving the pink showing.

To finish off, I put some of my rhinestones on each nail. Black stones on most nails, with silver stones on the nails with mostly black.


The stones would fall off occasionally and so I would need to reglue some new ones on. I did try setting the gems just in a fresh top coat and that seemed to work about the same.
Anyways, I thought it was real pretty, elegant, and simple!

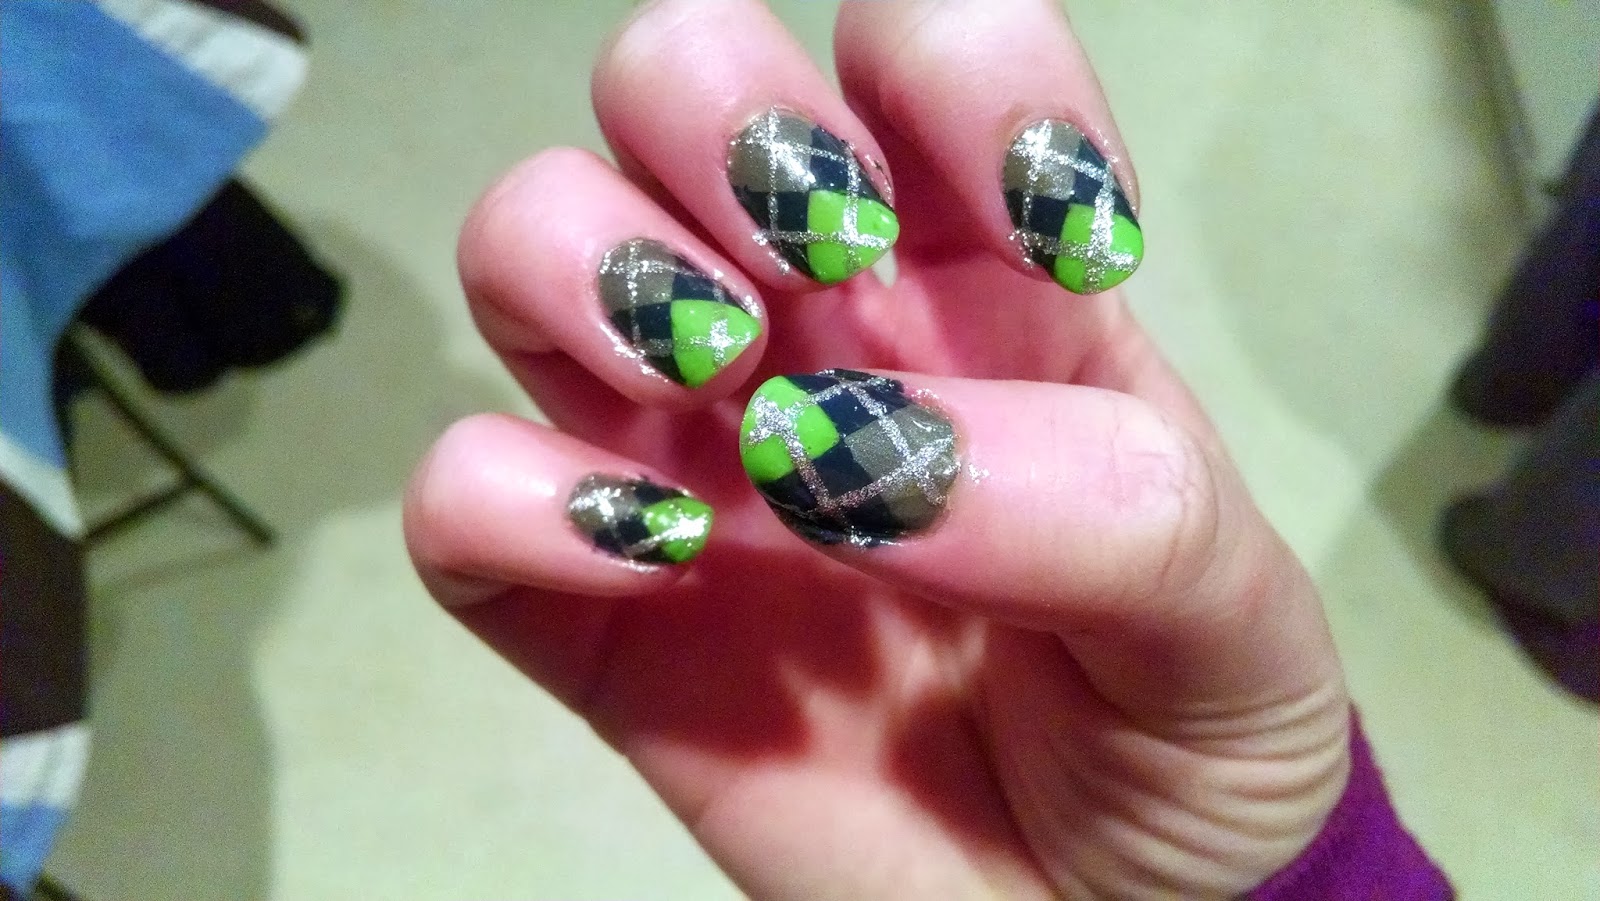
Super Bowl XLVIII Seahawks Argyle Patterned Nail Design

I know I've fallen behind on these blogs, so I made myself promise not to paint my nails again until I get something written! And so with that, I share the design I did to support the Seattle Seahawks at the Super Bowl this year.


The colors and polishes I used were::

Kiss Beach Green (it comes with a striper brush so getting an even coat was a little tough)
SinfulColors Slate
China Glaze First Mate
Kiss Silver Glitter

I do one nail (my pinky on my left hand) with Broncos colors. The polishes I used for that are:
Sally Hansen Hard to Get
China Glaze First Mate
Sinful Colors Snow Me White

I was inspired to do the argyle pattern from this youtube tutorial by MissJenFABOULOUS and it's super easy!!
The trick was to use scotch tape, cut off the jagged edges to make a straight edge, and then use the squared corner to get the pattern nice and clean!


I painted my nails with the Slate on the half of the nail at the base and the Beach Green on the other half. 
MAKE SURE YOUR NAILS ARE ABSOLUTELY COMPLETELY DRY BEFORE YOU PUT THE TAPE ON THEM!!!!! 
I thought they were dry, but the tape ended up taking most of the polish off with it. When I redid them, I waited until the next day before putting the tape on.
Put two squared off corners point-to-point, one over the green half, the other over the gray half. Then I put on a coat of First Mate and pulled off the tape after a minute or two had passed.


For the last step, I used Silver Glitter with its striper brush to put on the finishing touch to make the argyle pattern. As mentioned in the tutorial video, don't have the stripes meet in the middle of the edges of the design, otherwise you end up just making a giant diamond on your nail. 


Then just put on your top coat, and done! A sweet argyle pattern that can be used with a huge variety of colors! And they showed my pride for the Seahawks so well too!! (In the pic above you can kinda see my Broncos nail with the orange and blue, and then I used white with a striper brush to finish the pattern.)